BX-300 Mode Motor Repair Sankyo Transport Control Motor Problems
by Graham Monday, January 26, 2009
Sankyo Transport Control Motor Problems
The motor used in Sankyo transport decks is a major source of problems in these aging decks. The problem is seen as a deck that seems to not respond to front panel controls (play, stop, rewind, etc.) and on some decks where the transport mode lights flash after an attempted mode change. This is caused by a dead spot that has formed on the control motor stator. A short term fix is to open the deck and give the motor shaft a little nudge. This usually gets it out of that dead spot, but, it will get stuck again. Some people have had success with spraying Caig Labs, DeoxIT into the holes on the back of the motor and cycling the deck through the modes several times. A better solution is to remove the motor from the transport and after spraying in the DeoxIT to let it run for several minutes using an external power source between 4-9 Volts. This will help the motor brushed to scrap away the carbon in the dead spot. A more permanent solution is to disassemble the motor and use very fine grit sandpaper or steel wool to clean the stator while spinning the thing with and electric drill. Apply some DeoxIT and reassemble. There is one more possible solution. Replace the motor. Now these motors are no longer available from Nakamichi, but, two suitable replacements have been found that will require a few minutes of modification to the deck. The Mabuchi RF-370C-15370 motor from MCM Electronics for $32.65 (out of stock at last check) is a very close substitute. The Johnson RF-370C, P/N 174693 motor from Jameco Robot Store, for $2.49 has a slightly longer shaft, but, it will work fine. The mounting holes are 17mm apart on the motors and 16mm apart on the Nak transport. Take a small rat tail file and elongate the two holes on the transport to mount the new motor.
I decided that the best option for me was to “remove the motor from the transport and after spraying in the DeoxIT to let it run for several minutes using an external power source between 4-9 Volts. This will help the motor brushes to scrape away the carbon in the dead spot”. (Hopefully) The procedures explained below are to suit The Nakamichi BX300 deck but can possibly help with other Nak decks with the Sankyo transports. The BX300 is relatively easy as it does not require much disassembly and you don’t need to disturb the wiring loom or cut cable ties etc. There are a few things to watch for (as I discovered), but I will point them out along the way. Please read the text first before pulling anything to bits on each step.
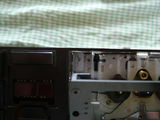
Cover removal
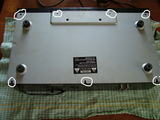
First step is to remove the outer top cover via the four screws, two in each side. Once you have the cover off, turn the deck upside down and remove the seven Philips head screws that hold the bottom base plate on and remove the base. Remove the cassette cover door.
Front removal
Remove the four Phillips head screws along the top edge of the front cover and unclip the surround by the press tabs located top and bottom. The surround should now lift free.
Back plate removal (1)
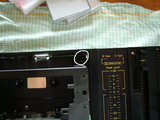
Next job is to remove the cassette well back cover plate. The plate is secured by two screws located in the top corners of the plate.
Back plate removal (2)
Once the screws are out you can tilt the deck forward and the plate will fall loose. Remove the plate. Note that this step is also what you need to do to get at the Idler tire assembly.
Back plate removal (3)
Locate mounting screws (1)
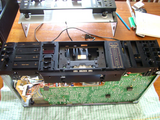
You can now get at the bits we need to look at. The next picture shows the mounting screw for the mode motor mounting bracket. It’s the bottom silver colored screw.
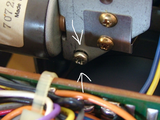
Locate mounting screws (2)
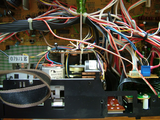
Thankfully Nakamichi’s designers have placed a hole in the circuit board that enables a screw driver to be placed as in the next photo. You will need to put a bit of pressure on the wiring so be careful that you do not dislodge or stress the loom unduly.
Locate mounting screws (3)
Remove this screw and the screw shown in the next picture (excuse the shitty picture). This screw is just above the take up reel spool.
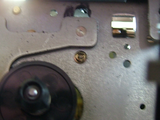
Remove motor assembly
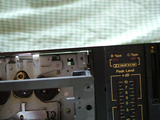
The mode motor assembly can now be removed up to where you can get at it. Undo the long screw that holds the leaf switches and remove the leaf switch block. Make sure the gear cam stays in place at this stage. Use a tissue or similar soaked in DeoxIT and clean the leaf switch contact points. This cleaning on my deck removed a heap of black oxide material. I guess this is a result of arcing between the contact points.

Note original position
I’m not sure if it’s critical but please NOTE the position of the cam wheel for reassembly. I fucked about for an hour or more trying to get all the modes to work before reinstalling the assembly in place and was getting pissed off as I must have tried every combination before I realized that the mechanism won’t work without with out the last arm activated. This is a steel arm that stays with the main mechanism. This arm rides on the last cam of the mode cam wheel. Be careful when reinstalling the assembly that this arm is indeed in the correct place. Once I activated this last arm everything worked perfectly with the gear placed as it was. I’m not sure that this was not just pure luck, so note the position of the cam wheel before you slide it off the shaft and try and get it in the same position when you reassemble.
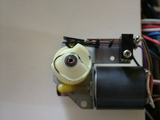
Clean
Once you have the mode cam wheel removed its time to get some DeoxIT into the back of the motor. There are several holes where the wiring goes in and a few others. Give them all a squirt, sit the motor so the liquid will sink in and leave it for 5 minutes to penetrate. Get a 9V battery and some jumper leads with alligator clips and connect onto the wiring on both ends of the disc ceramic capacitor on the back of the motor. Connect the other ends to the battery. Polarity is not important as you need to spin the motor for 5 minutes in both directions.
Reassemble
Give the motor another dose of DeoxIT and then reassemble the cam wheel and the leaf switch assembly. As mentioned before, be careful when installing the assembly back onto the main transport. Have a good look at where the steel arm rides on the cam and make sure it positions properly. The rest of the job is basically a reverse of the above. If your deck is slow in rewind and fast forward do the idler tire at the same time. ESL has good instructions on their web site for this procedure.